by Mike Atkinson (July 2011, updated May 2014)
For whatever reason, one challenge we faced in plumeria propogation was finding a reliable rooting method. We’ve tried just about everything and our success ratio was pathetic, well under 50%. We think a lot of it has to do with our hot, arid microclimate, but I’m sure there was also operator error involved.Then I was introduced to bag rooting and have achieved success well beyond my imagination. I’m now successfully rooting well more than 90% of my cuttings.
DISCLAIMER: There are many ways to bag root. People much smarter than I do it many different ways. I’ve tried many of those ways–some worked okay and some not. I’m not saying my way is the only correct way; only that it’s worked best for me. You’ll need to test it for yourself.
Benefits
- Works great with typically hard-to-root cuttings, such as thin cuttings, short, broken tips, and Singapores.
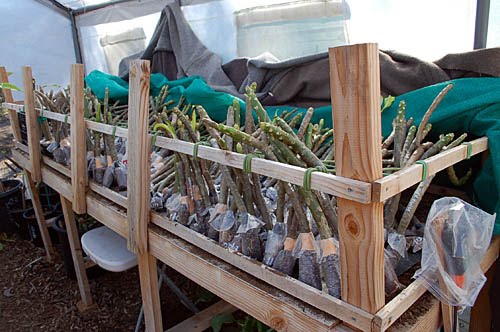
- Takes up much less space than pots.
- It’s really easy and fast to bag cuttings.
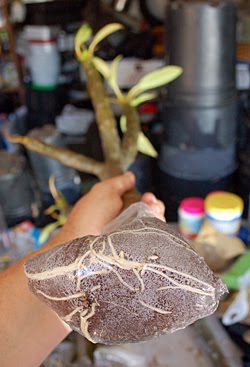
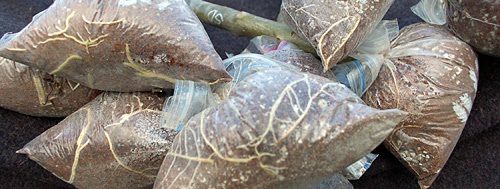
- See exactly when a cutting has rooted. Conventional wisdom for potted cuttings is to wait until you have 1″-2″ leaves before you start watering. However, the vast majority of my cuttings root long before showing any leaves whatsoever.
- Start watering and feeding the plumeria earlier than if I used a method that doesn’t allow me to see the roots.
CAUTION: The brass ring in plumeria rooting is speed – everyone wants the fastest way possible. I cannot say that bag rooting is the fastest method. I’ve had some root in 2-3 weeks. Most are around 6-10 weeks. Some have gone as long as 6 months before rooting. (I actually had one take one year!)
All that to say that there are many factors in rooting plumeria: Age and condition of the cutting, vitality of the mother plant, variety, etc. I’m not sure there are any scientific studies to prove which method is fastest, because of all these variables.
I’m looking more for reliability/success than speed, and that’s what bag rooting has delivered.
Materials
- Pleated sandwich bags (go generic…cheap!)
- Electrical tape
- Grease pen
- Potting medium (I use 75% coir and 25% pumice)
- A sealer
Possible rooting mediums:
- Coir (pronounced core); a natural fiber extracted from the husk of coconut (don’t get the chunky type that big-box department stores carry)
- Pumice (some nurseries carry it, as well as horse supply stores as Dry Stall)
- Peat moss (with or without perlite or pumice)
- Perlite only
What has worked best for me is coir and pumice. I’ve tested it against the other mediums and it’s is faster and the most consistent. Plus I believe the quality of roots is better. When unbagging, it doesn’t crumble as easily as the others.
TIP: You can add liquid rooting hormone to the water you use to soak the coir.
Possible sealers:
- Rubber band (size 32)
- Twist tie
- Tape (electrical or waterproof medical)
How to Bag
When to Unbag
Once you see a good amount of roots, then it’s time to unbag and pot the rooting. Don’t rush when you see the first sight of a root. Give it time to establish more roots, then pot it up.
How to Unbag
Hot or Not?
All of my bag rootings have been in a greenhouse or on heating mats. For me, this has been about maintaining optimum rooting temps, and about extending the rooting season. But there are many folks who don’t do that. They need heat, but not direct sunlight.
I tried rooting in multiple environments (greenhouse, heating mat, outside, garage) and all the cuttings rooted just fine. The heating mat cuttings rooted first, then the greenhouse, then the outside cuttings. I’ve also spoken to people who have placed them in totally dark garages, in attics, laundry rooms, and offices.
Hydration
One of the keys to success in bag rooting is a barely damp rooting medium. (If you have a moisture meter – available at most nurseries – you want the medium at around 20-25% moist.) One of the other advantages of coir is that you can easily see when it dries out. It turns a light red-tan color. If you have any type of heat on the bag, it will eventually dry out.
To rehydrate I use a simple turkey syringe (example) you can get at most grocery stores inexpensively. I fill it with water, insert it by piercing though the top of the bag, and inject about half of the contents into each dried-out bag.
TIP: You can add liquid rooting hormone to the water.
CAUTION: When inserting the syringe, be careful not to poke the cutting. (Yeah, I’ve done it plenty of times.)
Please feel free to send me any questions, comments, tips, ideas, gripes, etc.: mike@uneeknet.com
Additional note: Another use for bag rooting is in shipping cuttings. Bag rooting them before shipping will help to keep them hydrated during the shipping process.
Rooting table: I fit up to 400 cuttings in a space that would only take less than 75 one-gallon pots.
Other Bag Rooting Methods
Michele Wilcox’s bag rooting method
Irene Jone’s bag rooting with burlap method (PDF)
Mark Terrill’s bag rooting method: